새로 찾은 튜토리얼을 분석해보니, 혼란만 가중된다. 이게 맞나? 다른 튜토리얼을 찾아 검증하기 전에 현재 튜토리얼을 정리해보고 어떤 점이 혼란스러운지 확인해보자.
Make Diffusion model from scratch ( easy way to implement quick diffusion model )
This article is a tutorial on building a diffusion model from scratch by yourself. ( using TensorFlow / also have a PyTorch version…
tree.rocks

위 튜토리얼에서는 CIFAR10 중에서 자동차만 가지고 학습을 시킨다. 학습데이터가 5000장이라는 뜻인데 많은 숫자는 아니다. 사실은 "이렇게 적어도 되나?" 싶은 수준의 양이다.
IMG_SIZE = 32     # input image size, CIFAR-10 is 32x32
BATCH_SIZE = 128  # for training batch size
timesteps = 16    # how many steps for a noisy image into clear
time_bar = 1 - np.linspace(0, 1.0, timesteps + 1) # linspace for timesteps
plt.plot(time_bar)
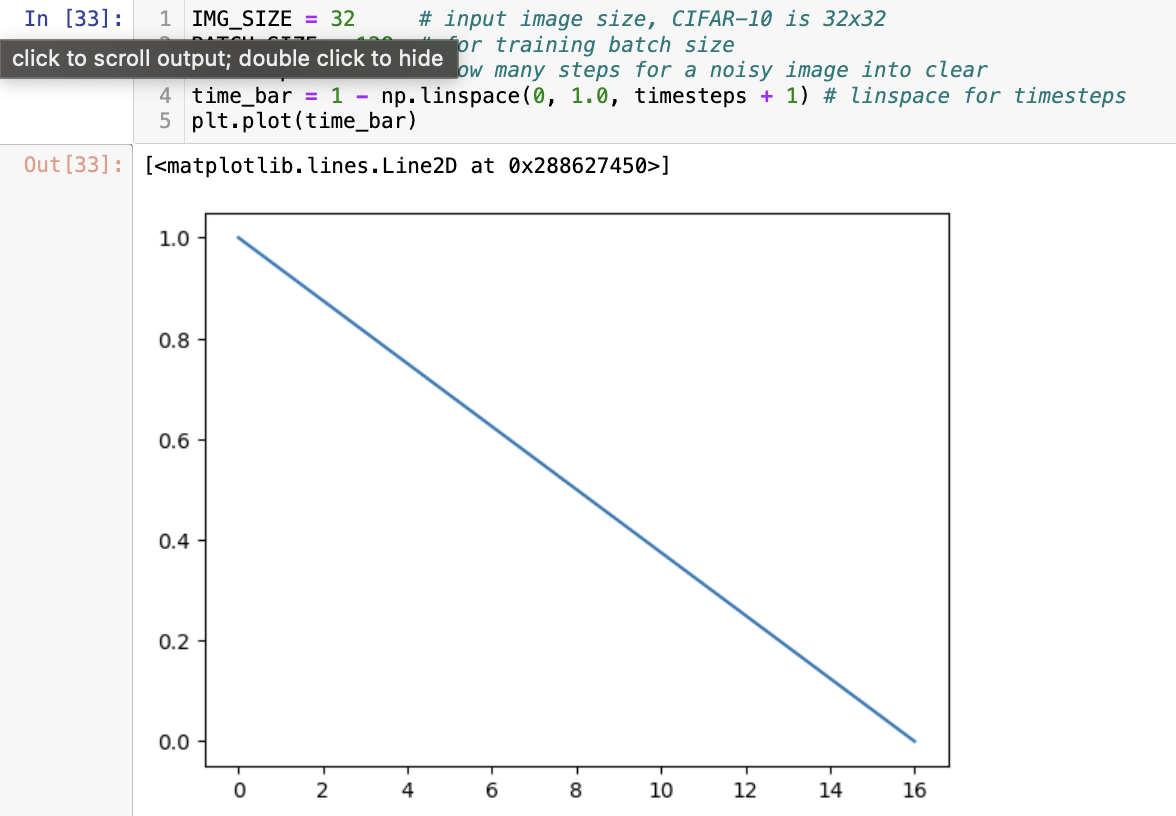
Global Variable들은 위와 같이 정의 되었다. 여기서 제일 중요한 것은 timesteps와 time_bar이다. timesteps는 Diffusion model이 노이즈로부터 원본 데이터를 복구하는 단계의 수를 뜻하고, time_bar는 각 단계에서 진행사항을 확인하기 위한 파라미터라고 생각하면 된다. time_bar는 아래와 같은 형상을 띤다. 17개 원소로 이뤄져있으며 원점에서 멀어질수록 작아진다.

def forward_noise(x, t):
    a = time_bar[t]
    b = time_bar[t+1]

    noise = np.random.normal(size = x.shape)
    a = a.reshape((-1, 1, 1, 1))
    b = b.reshape((-1, 1, 1, 1))
    img_a = x * (1 - a) + noise * a
    img_b = x * (1 - b) + noise * b
    return img_a, img_b
np.random.seed(21)
def generate_ts(num):
    return np.random.randint(0, timesteps, size=num)

t = generate_ts(25)
print("t 형상: ", t.shape)
display(t)
a, b = forward_noise(X_train[:25], t)
show_examples(b)
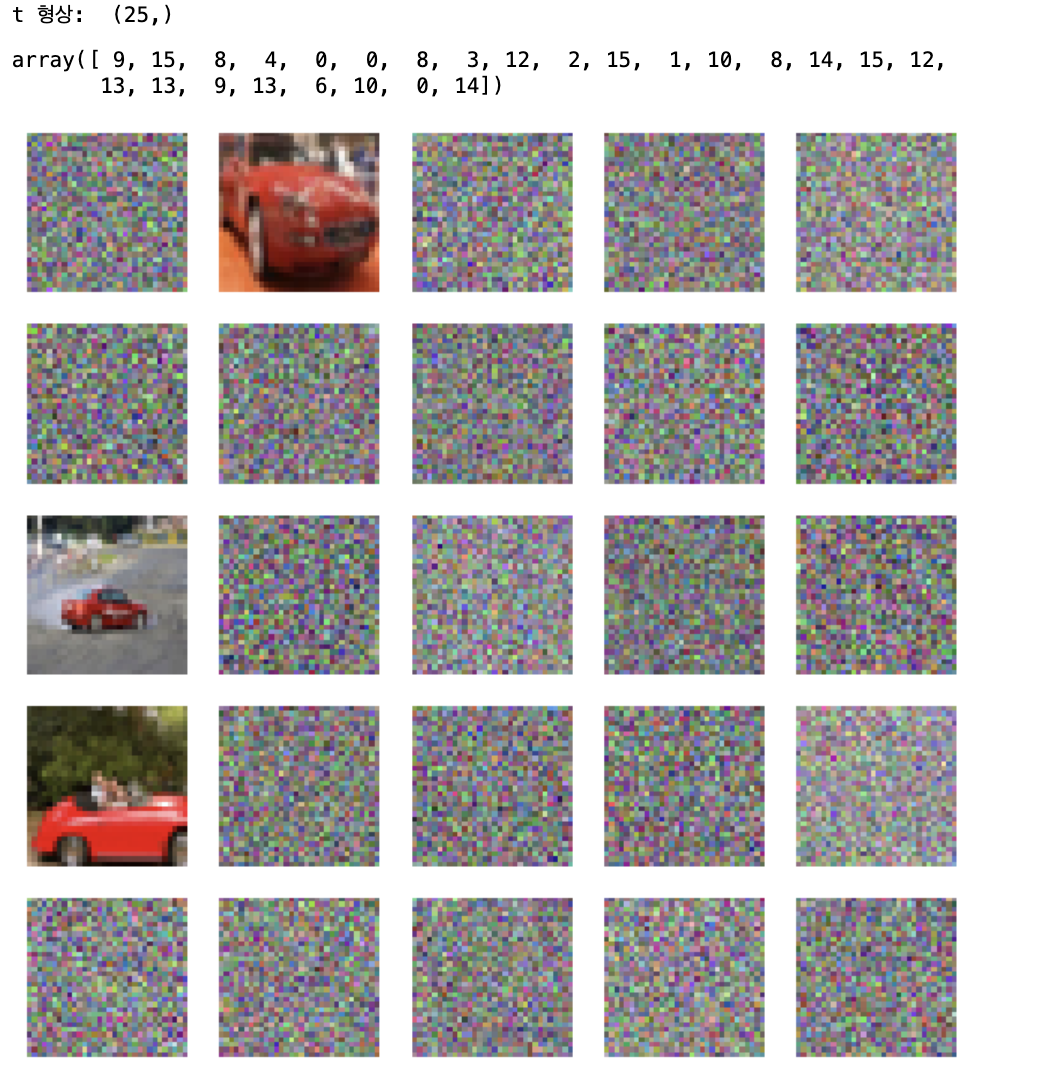
forward process는 위와 같다. time_bar가 바로 쓰였다. forward_noise는 img_a와 img_b를 반환한다. 두 개 단계를 배출하게 되어 있다는 뜻이다.
forward process가 이전 이미지에 노이즈를 입히는 역할임을 감안했을 때, input으로는 "이전 단계 이미지", output으로는 "노이즈를 입인 이미지"가 나오면 될 것 같은데 왜 두 개를 배출하게 될까? diffusion model은 단순히 sequential하게 학습이 이뤄지는 것이 아니다. Diffusion model의 궁극적 목적이 노이즈를 지우는 함수 q의 학습이라면, 각 단계별로 q의 활약이 달라진다고 말할 수 있다. 완전한 잡음에서 다음단계를 복구하는 일과, 그나마 실루엣이 보이는 그림에서 온전한 그림으로 복구하는 일은 성격이 다를 수밖에 없다.

그래서 튜토리얼의 forward process에서는 def q(x = "이전 단계 이미지"): return y = "노이즈를 입힌 이미지" 같은 식으로 작성된 게 아니라 두 가지 input을 받게 되어 있다. 첫 번째는 그냥 원본 이미지, 두 번째는 원하는 timestep 단계이다. 결과물을 배출할 때는 원하는 timestep 단계에서의 이미지 (노이즈를 입힌 이미지)와, 그 다음 단계 이미지 (노이즈를 한 번 더 입힌 이미지)를 배출하게 된다.

forward process 코드를 실행하면 위와 같은 결과물을 얻는다. 예시로 사용한 것이지만, t는 단일한 정수일 필요가 없다. 여러 단계를 동시에 확인하되, 5 by 5 image를 보여주기 위해 25로 설정한 것 뿐이다. t가 15일 때, 다시 말해 img_b의 경우 time_bar == 0.0 이므로 원본일 때를 제외하면 원본의 흔적이 거의 남아있지 않다. 이렇게 forward process가 끝났다.
def block(x_img, x_ts):
    x_parameter = layers.Conv2D(128, kernel_size=3, padding='same')(x_img)
    x_parameter = layers.Activation('relu')(x_parameter)

    time_parameter = layers.Dense(128)(x_ts)
    time_parameter = layers.Activation('relu')(time_parameter)
    time_parameter = layers.Reshape((1, 1, 128))(time_parameter)
    x_parameter = x_parameter * time_parameter

    # -----
    x_out = layers.Conv2D(128, kernel_size=3, padding='same')(x_img)
    x_out = x_out + x_parameter
    x_out = layers.LayerNormalization()(x_out)
    x_out = layers.Activation('relu')(x_out)

    return x_out

def make_model():
    x = x_input = layers.Input(shape=(IMG_SIZE, IMG_SIZE, 3), name='x_input')

    x_ts = x_ts_input = layers.Input(shape=(1,), name='x_ts_input')
    x_ts = layers.Dense(192)(x_ts)
    x_ts = layers.LayerNormalization()(x_ts)
    x_ts = layers.Activation('relu')(x_ts)

    # ----- left ( down ) -----
    x = x32 = block(x, x_ts)
    x = layers.MaxPool2D(2)(x)

    x = x16 = block(x, x_ts)
    x = layers.MaxPool2D(2)(x)

    x = x8 = block(x, x_ts)
    x = layers.MaxPool2D(2)(x)

    x = x4 = block(x, x_ts)

    # ----- MLP -----
    x = layers.Flatten()(x)
    x = layers.Concatenate()([x, x_ts])
    x = layers.Dense(128)(x)
    x = layers.LayerNormalization()(x)
    x = layers.Activation('relu')(x)

    x = layers.Dense(4 * 4 * 32)(x)
    x = layers.LayerNormalization()(x)
    x = layers.Activation('relu')(x)
    x = layers.Reshape((4, 4, 32))(x)

    # ----- right ( up ) -----
    x = layers.Concatenate()([x, x4])
    x = block(x, x_ts)
    x = layers.UpSampling2D(2)(x)

    x = layers.Concatenate()([x, x8])
    x = block(x, x_ts)
    x = layers.UpSampling2D(2)(x)

    x = layers.Concatenate()([x, x16])
    x = block(x, x_ts)
    x = layers.UpSampling2D(2)(x)

    x = layers.Concatenate()([x, x32])
    x = block(x, x_ts)

    # ----- output -----
    x = layers.Conv2D(3, kernel_size=1, padding='same')(x)
    model = tf.keras.models.Model([x_input, x_ts_input], x)
    return model

model = make_model()
# model.summary()
optimizer = tf.keras.optimizers.legacy.Adam(learning_rate=0.0008)
loss_func = tf.keras.losses.MeanAbsoluteError()
model.compile(loss=loss_func, optimizer=optimizer)
다음은 reverse process를 위한 U-net 모델 작성 파트이다. U-net의 경우 CNN 구조이지만, Encoder-Decoder 구조와 유사하기 때문에 generative AI에서 자주 사용하는 모델이다. 구조 자체를 이해할 필요는 없고 (사실은 있다. 나중으로 미룰 뿐...) input / output 형태만 확인하면 된다. 모델은 두 가지 입력을 받는데, 첫 번째는 이미지, 두 번째는 timestep이다. 노이즈가 섞인 이미지가 주어졌을 때, "얼마나" 노이즈를 복구해야 하는지를 설정해야 하는 것이다. 그리고 output 형태는 입력 이미지와 동일하다.

[1505.04597] U-Net: Convolutional Networks for Biomedical Image Segmentation (arxiv.org)
U-Net: Convolutional Networks for Biomedical Image Segmentation
There is large consent that successful training of deep networks requires many thousand annotated training samples. In this paper, we present a network and training strategy that relies on the strong use of data augmentation to use the available annotated
arxiv.org
diffusion network는 결국, 노이즈를 복구하기 위한 모델을 학습시키는 과정이다. forward process를 작성하면서 img_a와 img_b를 배출해냈다. img_b는 노이즈가 덜 입혀진 것, img_a는 노이즈를 더 입힌 것이고, 둘 사이에는 딱 한 단계 차이가 난다. 다시 말해, 모델에 img_a를 입력으로 주고 img_b를 ground truth로 제공하면, output으로 노이즈를 한 단계 벗겨낸 이미지를 배출받을 수 있다는 것이다. img_a가 주어졌을 때 img_b를 배출하는 prediction 함수는 아래와 같다.
def predict(x_idx=None):
    x = np.random.normal(size=(32, IMG_SIZE, IMG_SIZE, 3))
    for i in trange(timesteps):
        t = i
        x = model.predict([x, np.full((32), t)], verbose=0)
    show_examples(x)

def predict_step():
    xs = []
    x = np.random.normal(size=(8, IMG_SIZE, IMG_SIZE, 3))

    for i in trange(timesteps):
        t = i
        x = model.predict([x, np.full((8),  t)], verbose=0)
        if i % 2 == 0:
            xs.append(x[0])

    plt.figure(figsize=(20, 2))
    for i in range(len(xs)):
        plt.subplot(1, len(xs), i+1)
        plt.imshow(cvtImg(xs[i]))
        plt.title(f'{i}')
        plt.axis('off')
위 두 함수가 다른 역할을 하는 것은 아니고, 보여주는 방식이 좀 다를 뿐이다. predict 함수의 경우에는 완전한 노이즈로부터 16단계까지 모두 복구한 결과물을 보여주고, predict_step의 경우에는 2 단계씩 끊어서 (2, 4, 6, 8, 10, 12, 14, 16)단계에서 노이즈 제거 프로그레스를 보여준다.
def train_one(x_img):
    x_ts = generate_ts(len(x_img))
    x_a, x_b = forward_noise(x_img, x_ts)
    loss = model.train_on_batch([x_a, x_ts], x_b)
    return loss

def train(R=50):
    bar = trange(R)
    total = 100
    for i in bar:
        for j in range(total):
            x_img = X_train[np.random.randint(len(X_train), size=BATCH_SIZE)]
            loss = train_one(x_img)
            pg = (j / total) * 100
            if j % 5 == 0:
                bar.set_description(f'loss: {loss:.5f}, p: {pg:.2f}%')

for _ in range(10):
    train()
    # reduce learning rate for next training
    model.optimizer.learning_rate = max(0.000001, model.optimizer.learning_rate * 0.9)

    # show result
    predict()
    predict_step()
    plt.show()
이제 학습을 진행할 차례다. 10번 학습을 진행하게 되어 있는데, 각 단계가 끝날 때마다 predict와 predict_step을 통해 진행사항을 확인할 수 있다. 각 단계는 또 50번 학습을 진행하게 되어있다. 50번씩 묶인 단계에서는 5000개 자동차 데이터 중에서 BATCH_SIZE만큼 랜덤 선별하여 (128개) 또 총 100번 학습을 돌리게 되어있다. 다시 말해 100번 씩 50번 씩 10번, 총 50000번 iteration이 돌아가는 것이다. CNN만 쓸 때는 최대 iteration 설정을 25로 해두고 학습을 진행했었는데, Diffusion Model이 복잡하긴 하구나 싶다.

그럼 끝이다! 튜토리얼 말로는, 학습을 계속 진행하면 위와 같은 프로그레스를 볼 수 있다고 하지만, 내가 돌려본 결과 50000 iteration으로도 부족했다. 게다가, 논문에서 읽었던 막 루트 씌우고 별짓 다했던 것들이 튜토리얼에는 전혀 없었다. 논문에서 도저히 이해할 수 없을 것 같아 튜토리얼로 오긴 했다만, 너무 많이 생략된 느낌이다. 다음 튜토리얼을 찾아 떠나봐야겠다.
'트렌드 한눈에 보기 > 학계 트렌드' 카테고리의 다른 글
| Diffusion Model을 이해해보자 3편 - 새로 찾은 튜토리얼 도전 (0) | 2024.05.18 |
|---|---|
| Diffusion Model을 이해해보자 2편 - chatGPT로 튜토리얼 생성 망한 이유 (0) | 2024.05.16 |
| Diffusion Model을 이해해보자 1편 - 태초마을 (0) | 2024.05.12 |
| 예제와 함께 단숨에 이해하는 Lyapunov Stability [2/2] (2) | 2024.01.30 |
| 예제와 함께 단숨에 이해하는 Lyapunov Stability [1/2] (2) | 2024.01.13 |


